Black Forest is one of those special desserts, a cake that perhaps you only ate at certain times of the year, or when you had visitors. It may seem a little dated, but there is a certain charm to a dessert that seems simple in principle but has a grand allure to it.
The combination of chocolate, cherries and cream is a classic one, and while cherries are a summer fruit, preserved ones have become easier to find nowadays. Deep burgundy cherries soaked in kirsch are like little shiny jewels, offering a little pop of tart cherry liqueur in each bite. They can be found in jars in good supermarkets and are a wonderful addition to the pantry.
I have taken the concept of the Black Forest gateau and adapted it to a large and celebratory chocolate meringue pavlova. Pavlova is a dessert that can easily be altered with the seasons, by utilising whatever fruit is on hand.
This wintery chocolate version is gooey and chewy in the centre, the way a true pavlova should be. The addition of a little lemon juice and cornflour are the magic ingredients here that ensure a crisp exterior and meltingly soft inside. There is minimal effort in the rest; some pillowy whipped vanilla cream piled on top, finished with a scatter of cherries and shavings of chocolate.
If you can’t find cherries soaked in kirsch, you can cook some frozen cherries in a saucepan with a splash of water and a touch of sugar to sweeten. Once the cherries have burst and become soft, add a little cherry liqueur to taste.
The meringue is best cooked a day in advance and left to cool and dry out in the oven overnight.
BLACK FOREST PAVLOVA
Serves 12
Ingredients
For the meringue:
6 egg whites
pinch salt
320g caster sugar
1tbsp lemon juice
1tbsp cornflour
25g cocoa powder
For the cream:
300ml cream
20g caster sugar
1½ tsp vanilla extract
100g natural yoghurt
For the cherries:
300g cherries in kirsch
25g dark chocolate, grated
Method
1 For the meringue: Preheat the oven to 130 degrees and line a baking tray with a piece of parchment paper. Put the egg whites and salt in a spotlessly clean stand mixer bowl fitted with a whisk attachment and begin to whisk the egg whites on a slow speed until they become frothy.
2 Add 1tbsp of the sugar and increase the speed to medium. Continue to add the sugar, a tablespoon at a time, and continue to whisk until thick, voluminous and glossy.
3 Test the meringue by rubbing a little between your fingers, if you can't feel any granules of sugar, it's ready.
4 Add the lemon juice and sift in the cornflour and cocoa powder. Continue to whisk on a low speed until well combined.
5 Tip the meringue out on to the parchment paper and make a disc, about 18cm in diameter. Smooth the top and place in the preheated oven for 10 minutes.
6 Reduce the heat to 100 degrees and continue to bake for one hour and 10 minutes.
7 Turn off the oven and leave the meringue in the oven overnight.
8 For the cream: Whisk all of the ingredients except the yoghurt together until the cream reaches soft peaks.
9 Gently fold in the yoghurt. Set aside in the fridge until ready to serve.
10 For the cherries: Drain the cherries and set aside, reserving some syrup to garnish.
11 To assemble: Gently slide the meringue onto a serving plate. Pile the cream on top of the cooled meringue, and scatter the cherries on top. Drizzle a little of the syrup over the cherries, and finish with the grated chocolate.

Chocolate, orange and hazelnut Swiss roll
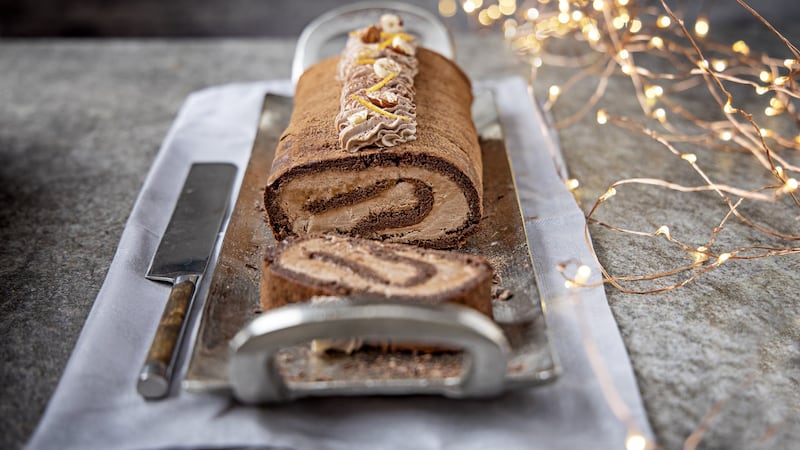
I used to adore Swiss roll as a child. Bowls of soft sponge with its swirly jammy centre served with thick bright yellow custard was a Friday treat. It was soothing and comforting, but even now, it’s one of those puddings that appears to be more of a faff to make by hand. But once you get the hang of rolling it, it’s a breeze.
The flavours here are a little more refined, a more glamorous version of that nursery-soft nostalgic Friday treat. Chocolate and orange reminds me of the festive season, and while we are ebbing our way ever closer to the big C, this is a luxurious dessert that you can make any time of year.
It’s gluten-free too, and with only three ingredients, is probably one of the easiest sponges to make. The egg yolks and whites are whisked separately and then folded together, this is the secret to a light and airy sponge.
The sponge needs to be rolled while it is still warm, this helps retain its shape and prevents it cracking later. It is then filled with a gorgeously smooth chocolate mascarpone cream, which has been spiked with orange zest and Frangelico hazelnut liqueur. Leave out the alcohol if you prefer, but it adds an intense hazelnut flavour that goes so well with the chocolate.
This is a great one to freeze ahead of time and it can be defrosted in the fridge a few hours before serving.
CHOCOLATE, ORANGE AND HAZELNUT SWISS ROLL
Serves eight
Ingredients
For the sponge:
6 eggs, separated
150g caster sugar
50g cocoa powder, sifted, plus extra for dusting
For the chocolate cream:
400g mascarpone cream
100g caster sugar
200g dark chocolate, melted and cooled
zest 1 orange
2tbsp hazelnut liqueur
100g cream, lightly whipped
To assemble:
50g hazelnuts, toasted and roughly chopped
1 strip of orange zest, cut into thin matchsticks
Method
1 For the sponge: Preheat the oven to 160 degrees. Line a baking tray with parchment paper.
2 Put the egg yolks into the bowl of a stand mixer fitted with a whisk attachment and add 100g of the sugar. Whisk the yolks for about five minutes, until they are pale and thick.
3 Scrape the egg yolk mix into a separate bowl and clean the bowl of the stand mixer. It is crucial that the bowl is spotlessly clean with no remnants of yolk, as any fat in the bowl will inhibit the aeration in the egg whites.
4 Start to whisk the egg whites on a low speed, and once frothy, add the remaining 50g sugar. Continue to whisk until stiff. Beat a third of the whisked egg white into the egg yolk mix. When fully combined, gently fold in another third, and then repeat with the remaining egg white. Sift in the 50g cocoa powder, and fold in.
5 Spread the sponge mix on the prepared baking tray and bake for 20 minutes. While the sponge is in the oven, dust some extra cocoa powder over a piece of parchment paper and set aside. Once the sponge is cooked, remove from the oven and while still warm, turn out onto the cocoa dusted parchment. Remove the parchment from the base of the sponge, and carefully start to roll the sponge up from the short side until you have a roll. Set aside to cool completely.
6 For the chocolate cream: Beat the mascarpone and sugar together until smooth. Fold in the melted and cooled chocolate, orange zest and hazelnut liqueur. Fold in the whipped cream and mix until fully combined.
7 To assemble: Unroll the Swiss roll and spread with most of the chocolate cream, reserving some for decoration. Roll up the Swiss roll, ensuring the seam is underneath. Pipe or spread the remaining cream on the top, and garnish with the toasted hazelnuts and the sliced orange zest.

White chocolate tiramisu cake
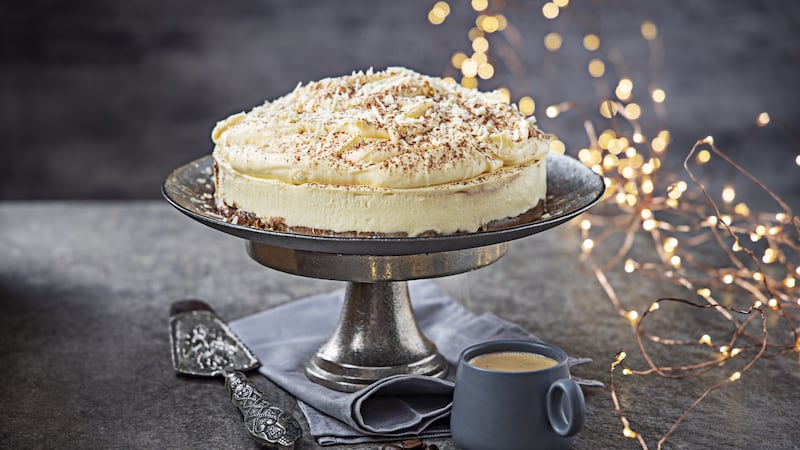
I’m a bit of a coffee fiend. I go to sleep looking forward to my cup of coffee the next morning. I tried drinking decaf for a while, but really, the placebo effect never worked on me.
Coffee is wonderful in so many desserts, it’s no surprise tiramisu and coffee cake are up there among my favourites. I use coffee as an accent flavour in chocolate desserts, as the bitterness cuts through the sweetness perfectly.
Try to source a good quality white chocolate, which will give this tiramisu a beautiful milky taste. Here I’ve cut down on the sugar as the white chocolate is sweet enough and turned the humble tiramisu into a cake, as a standalone piece that can be sliced and served. The gelatine in the recipe is there to give it that extra stability.
Orange zest is also lovely added to this cake if you’d like a little more of a diverse flavour. The eggs are kept raw in this recipe, something to note if serving to pregnant, younger or elderly guests.
This is best made a day in advance to allow it to set completely, and will keep for up to three days in the fridge.
WHITE CHOCOLATE TIRAMISU CAKE
Serves 12
Ingredients
For the base:
3 gelatine leaves
200ml strong coffee
30g caster sugar
20 sponge fingers
For the filling:
90g icing sugar
4 egg yolks
500g mascarpone
400g cream, lightly whipped, plus 50ml extra
3 leaves gelatine
350g white chocolate, finely chopped and melted
To garnish:
25g white chocolate, grated
Cocoa powder, for dusting
Method
1 Soak the gelatine leaves in cold water for five minutes. Heat the coffee in a saucepan with the sugar until the sugar has dissolved. Remove 75ml of the coffee and set aside for use later.
2 Squeeze the water out of the gelatine and add to the remaining 125ml coffee. Whisk well to ensure all of the gelatine has dissolved.
3 Dip a sponge finger into the warm coffee, soaking well, and place in the base of a 20cm loose-bottomed cake tin. Continue with three-quarters of the sponge fingers, breaking them up to fit the base snugly. Pour any remaining coffee syrup over the top of the sponges, and put the tin in the fridge to set while making the filling.
4 Whisk the egg yolks with the icing sugar until pale and creamy. Add the mascarpone and beat until fully combined. Heat the 50ml cream in a small pan and soak the gelatine leaves in cold water until soft. Squeeze out the excess water and dissolve the gelatine into the hot cream.
5 Add the melted chocolate to the mascarpone and mix well to combine. Mix in the warm cream, and finally fold in the whipped cream. Mix well until completely combined.
6 Pour half the mix on top of the set sponges. Dip the remaining sponges in the 75ml coffee that was set aside and arrange in the tin. Pour the remaining white chocolate mix into the tin and place in the fridge to set completely, at least four hours or overnight.
7 When ready to serve, remove the cake from the tin. Dust with cocoa powder and grated white chocolate to serve.


